Saturday, 12 October 2013

Cucubits! :)

I was amazed at the growth after a few warm days in the greenhouse this week!

So looking at a fabulous tray of cucumbers, squashes and pumpkins I decided they were big enough now to go out and enjoy the sunshine!

Last year my cucumbers all died :( , failing miserably to give me even a single cucumber! This year I’m DETERMIND that we will have cucumber FEASTS and they will give us prolific crops all Summer! Wishful thinking?


I at least got one plant’s tentacles to grab hold of the trellis before it perished last year and this year I’m going to try and get them all to grow into high-risers and get them up the trellis I built for the cucumbers and beans.


I have planted out;
  • Telegraph
  • Apple
  • Gerkins


I’m also trying a type called ‘spacemaster’ that apparently grows similar to a zuchinni which I'm trying in containers, since I have limited room in my garden! :)
 
Cucumber - Spacemaster
This picture is not of my plant – it’s what it will grow into (hopefully!)

Friday, 4 October 2013

Family Competition Time!


This year we decided to have a family seed competition with some sunflower seeds!
 
The kids were so excited with the idea they had to race out to plant their seeds in their pajamas!
 
Such a great learning experience for them and a fun family thing to do! Even hubby got into it!


I'm quite keen to give harvesting the seeds a go this year too - who knows if this will be easy or not! But it doesn't hurt to try!


Who's will grow the fastest?! The BIGGEST?! The Ugliest?

Sunday, 29 September 2013

Potatoes and garlic!

Garlic!
Again this year I was late putting the garlic in. But that doesn't seem to have bothered the garlic! Its already about 10cm high with growth! Great stuff! The garlic we grew last year was fantastic! Hope that we have the same luck this year!

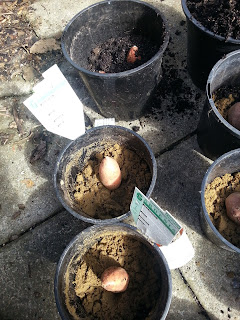
As for the potatoes... Last year I just shoved each spud that was in the seed bag in - so I had about 8 plants. I realise after a bit more reading that you are supposed to cut off each 'eye' or tuber (so its about 30-50g piece) and then let them sprout to plant. An average seed potato bag of 1.5kg should give you about 25-30 plants! So; here goes nothing! Out came the knife to get them ready for sprouting about 3 weeks ago for a few weeks in the dark doldrums of my garage to get the 'eyes' growing.

Now they have shoots on them 3-5cm long, so it's time to get them out into the real world! I've got my fingers crossed that they are going to work as where I've cut them they are moulded and shrivelled - BUT they do have shoots on them that look healthy..... Guess time will tell!

20130930_173603.jpg
 
I chose 2 varieties this year because of no real reason except the fact they both said 'heavy yielding' haha! I like to get my moneys worth! So, we have Agria, a boiling and baking spud; and Deseree which I've never heard of which is general purpose. Both of these are main crop varieties... so no spuds for Christmas this year!

If the instructions of cutting them into 30 plants is correct - they will take up most of an entire bed, and share it with my beans, kumara and yams.
  • My goal for the potatoes this year is to grow enough to last till the next season!
Gardening is all about trial and error. So to get to self sufficiency with my veges I'm guessing it's going to take a few years to get the proportions right!

20130930_172506.jpg
Digging the Trenches!
 

Saturday, 21 September 2013

Lightning... Flooding... Yet something SURPRISING!

Tomatoes!
After the nights storm and flooding we had, with at least a foot of water surrounding the house and a few waterfalls coming from the property above us - I really didn't think my poor pin-tacked greenhouse would be in survival mode!
 
But shock! Look at these babies that got lightning shocked out of hibernation!!!
 
The stunning day that followed the lightning filled night meant that opening my greenhouse was also followed with a burst of heat escaping!
 
Fantastic stuff for that germination!
 
 
I can’t believe how fast my cucumbers have shot up – less than a week after being under a plastic cover in the greenhouse!
 
Cucumbers!

I really was surprised! I was just grateful that it was still upright and intact to be honest! But this was a welcoming sight!

I did think the ‘greenhouse’ was officially all the cover they needed (since my greenhouse is only about a foot wide and a meter long!). I also thought that putting bags and covers over things in it was a bit over-kill! But now, I’m a firm believer of how SUPER fast things grow with the extra help!

I’m now going to get grabbing the plastic bags and put all those seedlings into them for help!

I might have to get some more of those covered seed trays! ;) 

Tuesday, 17 September 2013

You say potato... I say Oca?

Two things that my family LOVE are Kumara and Yams! There is nothing like a roast dinner with sweet potato and yams mixed with gravy :) mmmmmm... makes my mouth water just thinking about it.

I've never seen them in the shops to grow though... and as I've found out - they are hard to track down! There isn't much information out there - especially on Yams. The American's call NZ's version of Yams the sweet potato...... so that makes it a bit confusing trying to find information about how to grow them.

What I did find was several different methods to grow the kumara (sweet potato) which mostly involved using sand and sounded rather difficult! For Yams...... the only method I found was to put them in dirt?!? 

Most of the websites said you could just use the ones you buy from the store... 
which is good as I can't find them anywhere else!!!!

So I thought I'd do a trial with both the red and gold kumara using the three methods I found and just see what happened! Bring back memories of College Science Experiments? :)

Method One:
Put the kumara into a jar of water, changing the water every three days until sprouts appear.


Method Two:
Put the kumara in dirt and cover!

Method Three:
Put a 10cm layer of dirt on the bottom of the pot, followed by sand. Place the kumara in and cover with sand.


All of the methods second stage is to wait until the sprouts grow approx. 10-15cm and then break them off and plant them out. They all also recommend heavy non fertile soils for best results. They take about 5-6 months to fully mature in a good long warm season... so we are in for a wait!

The race is on!


Yams are a different story - Put them in a container of dirt, cover them and wait! They don't flower until 3 or 4 months after planting and then don't send out tubers until autumn..... So again, these plants could have a long wait ahead of them! They also need room temperature to sprout... so they might be joining the capsicums in the house if it doesn't warm up soon! :)


What's more exciting then trying something new?!

Saturday, 14 September 2013

Planting the first seeds...

According to the books, although I've been somewhat sceptical - it's time to start planting some seeds to be ready by the end of October to plant out into the garden.

Although most of the things I want to plant are probably not going to thrive with this cooler weather around at night still, they recommend planting out tomatoes, capsicums, silverbeet, spinach, beets and radishes among others.

Somewhat harmless to try - so off we go!~

As you can see in the pictures there are a few things sprouting up that I planted a week or so ago along with my cuttings that are still alive (yes... a lot didn't! Doh!).
 
My onions that I planted about a month ago have sprouted up and are now hardening off. :) A bit late to get them out into the garden - but I'm just happy that I got the shallots to germinate this time around! Onions were one of my "didn't have enough of veges" from last year - so this time I've gone all out! Hopefully I'll be able to store them properly so they don't rot. Watch this space!
 
  • My goal for seeds this year is to accurately label, no matter how painstaking it is!


One hint I have seen is to put all those warmer liking veges like tomato and capsicum into the hot water cupboard until they sprout.

Will I forget about them and let them sizzle? Probably! Could work if I somehow remember to keep them alive! I think I'll give them a go in the greenhouse first before I take over the hot water cupboard with plants though! :) Our house doesn't really have window sills to use to keep them indoors unfortunately either.... I don't trust them on the floor with nosey children (& cats!) around that they wont be upturned!

I hope my poor little greenhouse can give them the warmth they need!~ Fingers crossed!!!

Thursday, 12 September 2013

Out with the Old... In with the SPECTACULAR New!


I had a great adventure last week - making new bean supports! I wanted to still be able to rotate the beans... so I needed the support to be stable and sturdy, but able to be moved from bed to bed.

My good old bamboo trellis from last year has this rather bizarre unknown black sooty looking substance on it. Google couldn't help me. Neither could scrubbing. So I don't trust it to not kill off everything I grow with some random mutant disease, so out it goes! Instead a much better-on-the-eyes apparatus has been erected! I just hope it's stable enough, but it should be! (Fingers crossed!).


The best part about it was that it only cost $20 to make! Much cheaper than endless fancy bean supports. It was super easy to do, and its completely movable for next year (if it stays up - which of course it will!!! :P)

Just for a splash of spring - here is a picture of the blossoms that burst this morning on my plum tree! :)